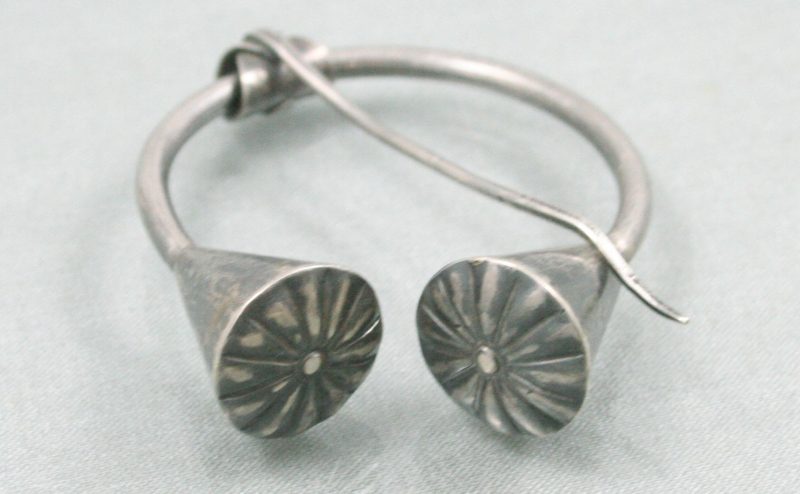
Cones are the basis for several types of stone settings and are also useful for other jewelry making, and recent updates to Illustrator make this shape a piece of cake (actually, pie…). I probably use Illustrator for making cones more than any other shape, and while these are still not that easy, I can save the shape to use again later.
If you want to make a crown setting, tapered round bezel, bead end cap, or aglet(cord end), it might be necessary to make a cone pattern. And while there are many online cone pattern generators to choose from, sometimes it’s helpful just to make it yourself. It’s not that hard, but it helps if you have some math skills.

Note: many times in metalwork what we actually want is an inverted, truncated cone. This is a cone with the end cut off, and the wide base at the top. In profile, it looks like an upside-down trapezoid. For purposes of this article, when I talk about the base of the cone, I mean the widest end, and the top is the smallest end. In this example, I am making a truncated cone that is 10mm wide at the top, and 6mm tall, with a 45° angle.
Steps to make a cone pattern:
- Determine the angle for your cone/setting; most common setting angles are 45°, 70°, and 90°.
- determine the base width and, if making a truncated cone, the finished height.
- Create two circles (one, if you don’t need a truncated cone)
- Make the circles into pie slices
Create the right size circles for your cone pattern
Getting the circles the right size is the hardest part. Here is where you will need a little bit of math (trigonometry). Calculators make this easy. The cross section of the cone makes a triangle, and we can divide that cross section into two right triangles. The hypotenuse of those triangles is the radius of the circle we need to draw for our pattern. The concept is that in a right triangle, the ratio of two sides is always the same for a particular angle. So you use those ratios (sine, cosine, and tangent) to figure out the unknown side (which is our circle radius). So for our cone pattern we will create a circle with a diameter using this formula:
D = 2(cone base radius / sin(angle/2))
For a 10mm wide cone, at a 45° angle, this is:
D = 2(5/sin(22.5°))
D = 26.13
If you want to create a cone that is cut off at a certain height, a second circle is required. If not, just skip making a second circle. If you don’t cut off the top, and you are making a very small cone, it will be necessary to file the metal at the top so that the sheet is thin enough to close the shape. Before we can even figure out this second circle’s diameter, we will need to do some more math on our cone profile to figure out how much needs to be cut off the top. We will use the radius of the first circle and the radius of the cone base as two sides of a right triangle to figure out the height, using basic geometry.
a2+b2=c2
cone base radius(5mm)2+ cone height2 = cone side length(13.06)2
52+b2= 13.062
25+b2= 170.56
b2 = 145.56
b= 12.06
Height of cone to be cut off: 12.06 – 6 = 6.06 (leaving a 6mm truncated cone).
Now, knowing the height, we can figure out the circle diameter for the second circle using cosine.
D = 2(6.06/Cos(angle/2))
D = 2(6.06/cos(22.5°))
D = 13.12

Now there are two circles, but we still need to create our cone pattern from these. That is where Illustrator’s tools help most.
In the transform menu, when you have a circle selected, you can create a “pie slice” (you may need to expand the menu to see these options). For our cone, the pie slice that will be the right length has an angle that is equal to 180 divided by the outside circle radius, multiplied the diameter of the cone base. (180/13.06)*10, or 137.93°.
Align the circles to each other on-center. With both circles still selected, in the “pie end angle” field of the transform menu, enter the pattern arc measurement (137.93°). If you are just doing a regular cone from a single circle, you can just make your pie slice and you are done.
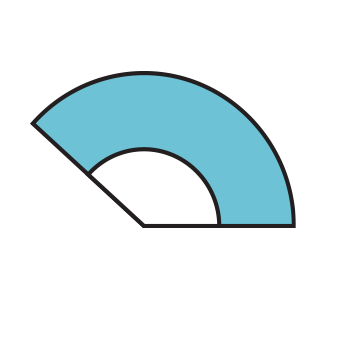
You could use the pathfinder menu to delete the top pie slice for the truncated cone pattern, but I prefer to just group these and leave them. I can easily change this pattern by going back to the transform menu and changing the ellipse size to get a different diameter, and my pattern will still work.
If this seems like a lot of work, well, it kind of is. After a few times, though, it’s not that bad – and being able to make a cone of any size and shape is a useful skill. But thins kind of thing isn’t for everyone.
If you are interested in a sheet of pre-made cone pattern templates that you can print out, leave me a comment here and I’ll send you one. I also have an excel file for generating the pattern circle diameters and arc measurement, if interested.